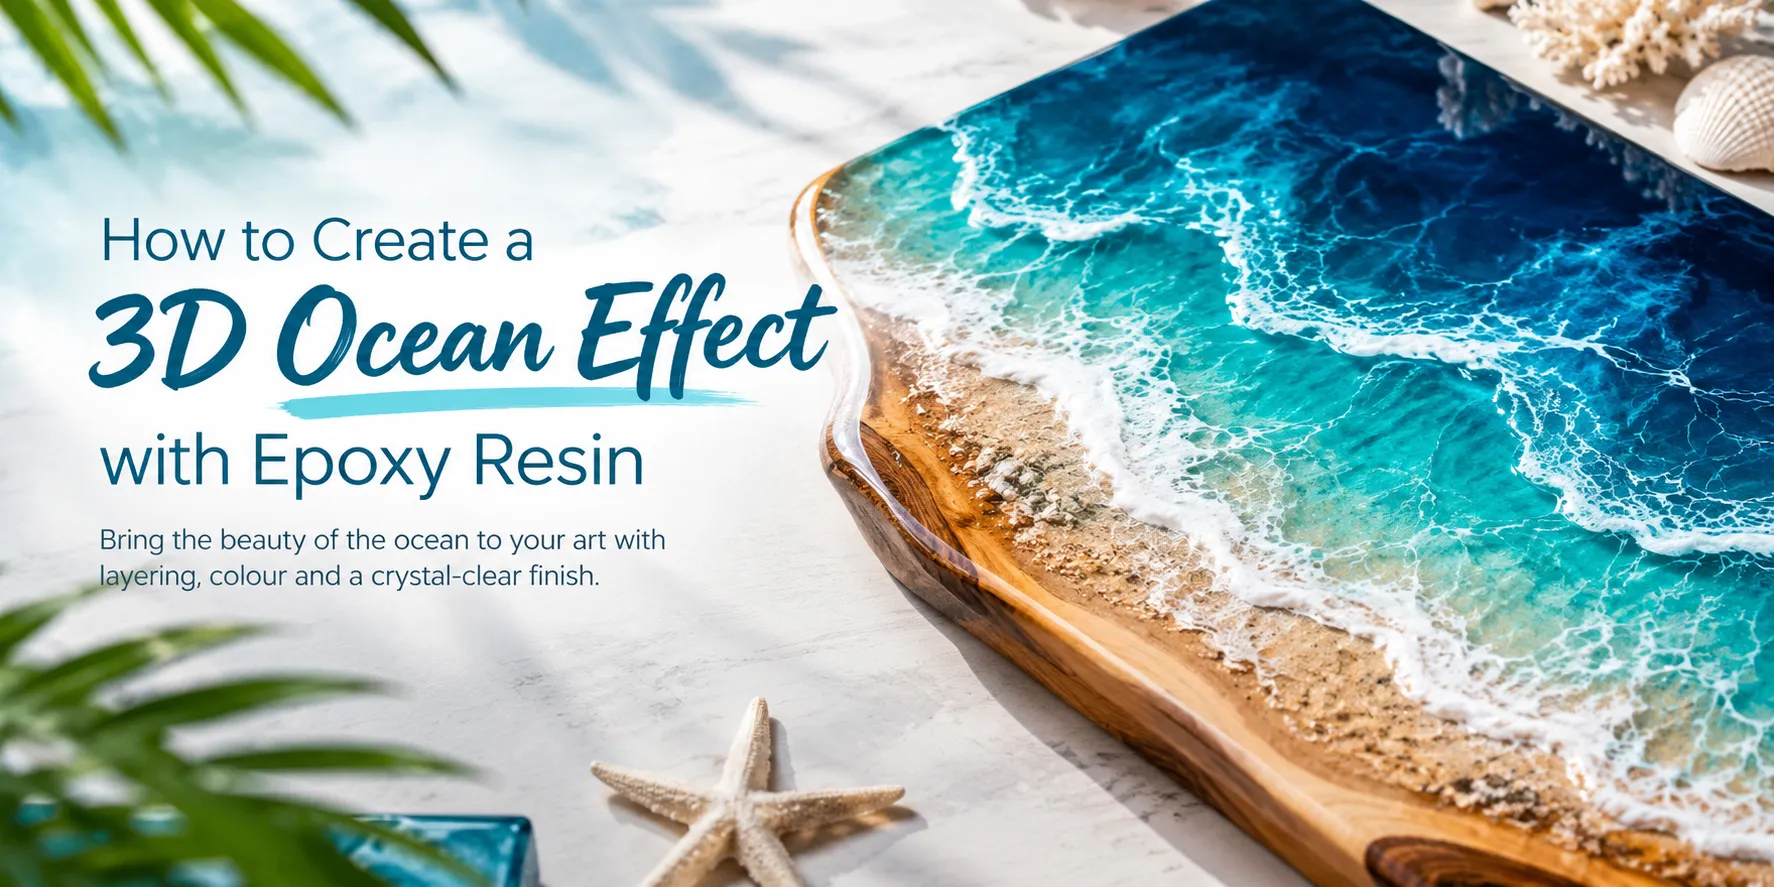
How to Create a 3D Ocean Effect with Epoxy Resin
Create a stunning 3D ocean effect with epoxy resin and transform an ordinary surface into a beautiful piece of ocean-inspired art. With realistic blue waves, crystal-clear water effects, white sea foam, and sandy textures, epoxy resin allows artists to recreate the natural beauty of the sea in a unique and creative way. Whether you are a beginner or an experienced resin artist, this technique can help you produce decorative trays, wall art, coasters, serving boards, and eye-catching ocean-themed centrepieces.
The secret to achieving a realistic 3D ocean effect lies in building multiple layers, selecting the right resin colours, controlling the movement of white pigment, and creating depth between the different sections. Rather than mixing all the colours together, each layer is carefully positioned to imitate the appearance of shallow turquoise water, deep ocean blues, foamy waves, and sandy beaches.
In this comprehensive guide, we will explain how to create a 3D ocean effect with epoxy resin, which materials you need, how to layer the colours, how to create realistic waves, and how to achieve a professional glossy finish. You will also learn about common mistakes, curing conditions, and practical tips for creating beautiful ocean resin art at home.

Res-iT 2L Pro Epoxy Resin Kit

Res-iT Epoxy Resin 1L Starter Kit

Res-iT Epoxy Resin 480ml Starter Kit
What Is a 3D Ocean Effect in Epoxy Resin?
A 3D ocean effect is an artistic resin technique that uses transparent and coloured epoxy layers to create the illusion of depth, movement, and realistic ocean waves. The finished artwork can resemble a tropical shoreline, a deep blue sea, or waves washing across a sandy beach. When viewed from different angles, the transparent resin layers and contrasting colours create a dimensional appearance that makes the artwork look almost like a miniature ocean.
Unlike a flat painting, a layered ocean resin design creates visual depth through the interaction of translucent blue resin, opaque white wave details, and contrasting backgrounds. Each layer contributes to the final appearance, making the artwork look more natural and visually interesting.
The technique can be adapted to different projects, including:
Ocean resin wall art: Create a coastal-inspired artwork featuring rolling waves and turquoise water.
Resin serving trays: Design decorative trays with a beach scene and flowing white wave details.
Ocean resin coasters: Create small decorative pieces with sandy shorelines and blue water.
Resin tables: Add ocean-inspired designs to suitable tabletops for a distinctive furniture finish.
Decorative centrepieces: Make sculptural ocean-inspired pieces for coffee tables, shelves, and display areas.
Coastal home decor: Produce personalised decorative pieces that complement modern, beach-inspired interiors.
By adjusting the colours, transparency, and wave patterns, you can create anything from a calm tropical lagoon to a dramatic deep-sea design.
Materials Needed to Create a 3D Ocean Effect with Epoxy Resin
Before starting your project, prepare all the materials you need. Having everything ready makes it easier to work within the resin's working time and helps you achieve better control over the design.
1. Epoxy Resin and Hardener
Choose a high-quality epoxy resin system suitable for your intended project. The resin and hardener must be mixed in the exact ratio specified by the manufacturer. Some systems use a 1:1 ratio, while others require different proportions. Always follow the instructions supplied with your selected product.
For layered ocean art, select a resin that is suitable for decorative casting or coating, depending on the project. Check the maximum permitted pour depth, working time, curing time, and compatibility with pigments before beginning. Deep-pour and coating resins are not automatically interchangeable.
2. Blue, Turquoise, and White Pigments
Colour selection is essential for creating realistic ocean depth. A combination of transparent and opaque colours helps separate the different sections of the design.
Deep navy blue: Creates the appearance of deep ocean water.
Sapphire blue: Adds rich colour and visual contrast.
Turquoise: Represents shallow tropical water near the shore.
Transparent resin: Adds clarity and a natural water-like appearance.
Opaque white pigment: Creates the foamy appearance of breaking waves.
Pearlescent pigment: Adds subtle shimmer and highlights to selected areas.
Use pigments designed for epoxy resin and follow the manufacturer's recommended loading. Excessive pigment can affect curing, transparency, and the final appearance.
3. Sand and Beach Textures
Fine, clean, completely dry sand can be used to create a realistic shoreline. It may be secured to a suitable prepared surface or incorporated into a compatible design before the resin layers are applied. Ensure the sand is dry and free from contaminants to reduce the risk of cloudiness, bubbles, and adhesion problems.
4. Mixing and Application Tools
You will also need the following tools to create and control the ocean effect:
Clean mixing cups and suitable stirring sticks.
Accurate measuring equipment, where required by the resin system.
Silicone moulds or a suitable prepared substrate.
Disposable gloves and appropriate protective equipment.
Small mixing cups for separate resin colours.
Fine artist's tools, palette knives, or small spatulas.
A pipette or dropper for placing small amounts of coloured resin.
A heat tool only if permitted by the resin manufacturer's instructions.
Suitable dust covers to protect the artwork during curing.
Step 1: Prepare Your Workspace and Surface
Good preparation is the foundation of successful epoxy resin art. Dust, moisture, uneven surfaces, and incorrect room conditions can affect the appearance and durability of your finished piece.
Choose a clean, level, well-ventilated workspace with enough room to position your mould or project base. Protect the worktable with a suitable covering and make sure the surface cannot move while you are pouring the resin.
If you are using a wooden base, check that it is dry, stable, and suitable for resin application. Depending on the material, sealing the surface first can help reduce air bubbles released from the substrate. Allow any sealer to cure completely before proceeding.
For a mould-based project, ensure the mould is clean, dry, undamaged, and compatible with epoxy resin. Position it on a level surface so the liquid resin does not flow towards one side.
Before mixing, read the product instructions and prepare your pigments, cups, tools, and protective equipment. Wear suitable chemical-resistant gloves and eye protection, and follow the resin manufacturer's ventilation and safety requirements. Avoid direct skin contact with uncured resin.
Step 2: Plan Your Ocean Design
Before pouring any resin, decide how your ocean scene should look. A clear design plan helps you control the colours and create a more realistic sense of depth.
For a classic beach-inspired composition, divide the surface into three main areas:
Deep water: Use navy or sapphire blue at the far edge of the ocean.
Shallow water: Transition from medium blue into turquoise and transparent resin.
Sandy shoreline: Position natural sand or a beige beach texture along one edge.
Leave space between the major colour areas for the white waves. Instead of creating a perfectly straight boundary between the sea and beach, use an irregular shoreline to imitate the natural movement of water.
For a more dramatic 3D effect, vary the width and direction of the wave lines. A few larger waves combined with smaller foam details often look more natural than repeating identical patterns across the entire surface.
Step 3: Mix the Epoxy Resin Correctly
Measure the resin and hardener according to the manufacturer's specified ratio. Some products use a ratio based on volume, while others specify a ratio by weight. These methods are not necessarily interchangeable, so use the correct measuring method for your selected product.
Combine the two components in a clean mixing cup and stir slowly, scraping the sides and bottom regularly. Mix for the recommended time until the components are thoroughly combined. Avoid vigorous stirring because it can introduce unnecessary air bubbles.
If your resin system recommends transferring the mixture into a second clean cup and mixing again, follow that procedure. Incomplete mixing can cause soft areas, sticky surfaces, or uneven curing.
Once the resin is properly mixed, divide it into smaller cups for your different colours. Keep a portion clear for transparent water effects, then prepare separate batches of deep blue, turquoise, and opaque white.
Only prepare the amount of resin you can safely use within the product's working time. Resin may generate heat while curing, particularly when too much is mixed in one container. Never leave a large batch sitting unattended in a deep cup.
Step 4: Create the Deep Blue Ocean Layer
Begin by applying the deepest blue colour to the section representing the open ocean. This dark background provides contrast and helps the lighter colours appear more luminous.
Pour the blue resin slowly into the planned ocean area. Use a suitable spatula or spreading tool to guide it into position without blending it excessively into the neighbouring sections.
For a more natural appearance, introduce subtle variations in the blue tones. A darker section can represent deeper water, while a slightly lighter sapphire area creates a transition towards the shore.
Keep the colour distribution irregular and organic. Avoid making the ocean look like a single flat block of colour. Small differences in tone and transparency make the finished artwork appear more dimensional.
Allow the layer to settle according to the resin manufacturer's instructions. If your project requires multiple separate pours, observe the specified recoat window and surface-preparation requirements before adding the next layer.
Step 5: Add Turquoise and Crystal-Clear Water
Once the deep blue section is positioned, introduce turquoise resin closer to the shoreline. This colour transition recreates the appearance of shallow water where sunlight penetrates the sea.
Pour the turquoise in an uneven band beside the deeper blue. Use a small tool to guide the edge into gentle curves, allowing some areas to extend farther into the dark blue while others remain closer to the beach.
Next, incorporate clear resin where you want the water to appear transparent. The clear section can create a beautiful transition between turquoise water and the sandy beach.
Work carefully to preserve the different colour zones. A little blending can create a natural gradient, but mixing all the colours together may produce a muddy appearance and reduce the illusion of depth.
Remember that transparency depends on the substrate, resin thickness, pigments, and lighting. Test your colour combinations on a small sample before applying them to an important project.
Step 6: Create the Sandy Beach Effect
A convincing beach scene needs a natural transition between the sand and water. Fine, dry sand creates texture that contrasts beautifully with the glossy surface of the cured resin.
For a mould-based design, arrange the sand in the designated beach area using a suitable method that keeps it stable. For a wooden or other solid base, ensure the sand is securely attached and compatible with the resin system before applying the ocean layers.
Shape the shoreline with gentle curves instead of a straight line. You can make one section of the beach wider and another narrower to create a more realistic coastal scene.
Apply clear resin carefully where appropriate to integrate the beach with the water. Avoid adding excessive resin to loose sand, as it may displace the texture or obscure the natural appearance.
For an elegant finish, keep the sandy section relatively simple. A balanced combination of neutral sand, transparent water, and rich blue tones generally looks more sophisticated than a design overloaded with decorative materials.
Step 7: Create Realistic White Ocean Waves
The white wave effect is one of the most important parts of 3D ocean resin art. It creates the illusion of moving water and gives the finished artwork its distinctive coastal appearance.
Prepare a small amount of resin with an appropriate opaque white pigment. The colour should be strong enough to create visible foam but remain compatible with the resin system.
Apply a thin, irregular line of white resin along the boundary between the blue water and the turquoise or sandy shoreline. Use a fine tool to shape the line into soft curves, small branches, and uneven foam patterns.
For a more natural effect, vary the width of the white line. Keep some areas thin and delicate while allowing selected sections to become broader, suggesting waves breaking against the shore.
Depending on the resin's viscosity and working time, a suitable heat tool or gentle airflow may help move the white pigment and create lacing effects. However, use only techniques approved for your particular resin system. Excessive heat or strong airflow can cause ripples, bubbles, overheating, or unwanted pigment movement.
For better control, test the technique on a sample before working on the final piece. Different pigments and resin formulations behave differently, so the ideal method may vary between products.
Tips for More Natural Wave Patterns
Use several different wave sizes rather than repeating the same pattern.
Keep some areas of the shoreline exposed to create visual breathing space.
Use small branching details to imitate delicate sea foam.
Maintain visible blue and turquoise areas between the white waves.
Avoid adding too much white pigment, which can make the artwork look cloudy.
Allow the colours to create a natural flow rather than forcing perfectly symmetrical lines.
Step 8: Build Multiple Layers for a True 3D Appearance
Layering is what separates a simple ocean-coloured resin surface from a convincing dimensional artwork. Multiple transparent layers can create the impression that the viewer is looking through the surface of the water.
For suitable projects, apply a clear layer over a completed and properly prepared ocean design. This transparent layer can increase the sense of depth and create a smooth, unified surface.
If you want more pronounced depth, plan the artwork in stages. Position the darker ocean at the back, the lighter water in the middle, and the shoreline and selected foam details towards the front. When appropriate for the chosen resin, separate pours can make these elements appear to occupy different visual planes.
Always observe the maximum pour depth and temperature limits for your resin system. If the project requires several pours, follow the specified timing and preparation instructions for bonding between layers. Pouring a coating resin too deeply or adding another layer outside its recommended recoat window can lead to overheating, poor adhesion, or visible layer lines.
Allow each layer to reach the appropriate stage before continuing. Some systems permit recoating while the previous layer is still within a specified bonding window, whereas others require full curing and surface preparation before the next application.
Do not rush the process. A carefully planned sequence of thin, compatible layers can produce a more attractive result than trying to create the entire scene in one excessive pour.
Step 9: Remove Bubbles and Protect the Artwork
Small bubbles can affect the clarity of transparent resin and distract from the ocean effect. Good mixing techniques and careful preparation help reduce them from the beginning.
After pouring, inspect the surface under suitable lighting. If bubbles are visible, use only a bubble-removal method approved by the resin manufacturer. Excessive heat can damage the resin, create surface defects, or cause a large batch to overheat.
Never use an open flame around resin, solvents, or other flammable materials. If a heat tool is permitted, keep it moving, use a suitable distance, and avoid prolonged heating in one area.
Once the surface is prepared, protect the artwork with a clean, dust-free cover that does not touch the resin. Leave it undisturbed in the recommended curing environment.
Keep the workspace within the manufacturer's specified temperature and humidity range. For many resin projects, a stable room temperature around 20–25°C can be suitable, but the instructions for the particular product always take priority.
Step 10: Allow the Resin to Cure Fully
Curing is a critical stage in creating a durable and glossy ocean resin piece. Even if the surface looks dry, the resin may not have reached its full hardness or final properties.
Leave the artwork undisturbed for the time recommended by the manufacturer. Avoid moving the piece, placing objects on it, or exposing it to dust and moisture during curing.
Remember that working time, touch-dry time, demoulding time, and full cure time are different. The exact schedule depends on the resin formulation, room temperature, pour depth, and other conditions.
Do not attempt to demould, sand, polish, or use the artwork until it has reached the appropriate stage specified for that operation. Premature handling can leave marks, distort the design, or damage the surface.
Step 11: Finish and Polish Your 3D Ocean Artwork
After the resin has fully cured, inspect the piece for sharp edges, surface imperfections, and areas that may require finishing. If the design uses a mould, remove the artwork carefully to avoid stressing thin edges or delicate decorative sections.
If necessary, sand suitable cured resin surfaces using an appropriate method and progressively finer abrasives. Follow suitable dust-control precautions, including respiratory and eye protection, and avoid inhaling resin dust. Clean the surface thoroughly before applying any compatible finishing coat.
A compatible clear coating may help create a uniform glossy appearance where the project requires one. Follow the manufacturer's surface-preparation and application instructions, and allow the finishing layer to cure completely before handling the artwork.
For a premium presentation, place the completed piece in an environment that complements its colours. A neutral cream background, natural wood, or understated marble surface can make sapphire blue, turquoise, and gold details stand out beautifully.
Best Colour Combinations for 3D Ocean Resin Art
Colour selection has a major influence on the realism and overall mood of an ocean resin design. The following combinations can help you create different styles of artwork.
1. Tropical Turquoise and White
Combine transparent resin, bright turquoise, pale aqua, and white foam to recreate a tropical shoreline. This palette works particularly well for coasters, trays, and light-coloured decorative pieces.
2. Deep Sapphire Blue and Pearl White
Use navy blue, sapphire, and pearlescent white to create a dramatic ocean scene with rich contrast. This combination is suitable for statement wall art, decorative centrepieces, and contemporary interiors.
3. Ocean Blue with Metallic Gold
Add restrained gold accents to a deep blue and transparent resin design for an elegant, luxurious finish. Keep the metallic details subtle so they complement rather than overpower the wave patterns.
4. Sea Green and Sandy Beige
Combine sea green, muted turquoise, transparent resin, and natural beige textures for a softer coastal look. This palette pairs well with natural wood, cream decor, and minimalist spaces.
Common Mistakes to Avoid When Creating Ocean Resin Art
Even a well-planned design can be affected by mistakes during mixing, pouring, layering, or curing. Understanding these issues can help you achieve a more consistent result.
Using the Wrong Resin for the Pour Depth
Not every epoxy resin is designed for deep casting. Using a coating resin in a thick pour may cause excessive heat, discolouration, cracking, or other defects. Check the permitted pour depth and use a suitable system for your project's dimensions.
Adding Too Much Pigment
Excessive colourant can affect curing and reduce the transparency needed for a realistic ocean effect. Use pigments specifically designed for epoxy resin and follow the recommended loading.
Mixing the Resin Incorrectly
Incorrect measuring or insufficient mixing may result in sticky patches, soft areas, or uneven curing. Follow the correct ratio and mixing instructions for your particular product.
Creating Waves That Look Too Uniform
Perfectly straight white lines can make the ocean scene look artificial. Vary the direction, width, and shape of the foam to imitate natural wave movement.
Pouring New Layers at the Wrong Time
Applying another layer too early or too late can affect the bond between layers. Follow the manufacturer's recoat window and surface-preparation requirements.
Ignoring Temperature and Dust
Unstable temperatures can change the resin's working and curing behaviour, while airborne dust can settle on the surface. Maintain suitable conditions and cover the artwork during curing.
Safety Tips for Working with Epoxy Resin
Epoxy resin can be used successfully for decorative projects, but uncured resin and hardener must be handled carefully. Always read the product's safety data sheet and manufacturer instructions before starting.
Wear suitable chemical-resistant gloves and eye protection.
Work in a well-ventilated area and use any respiratory protection specified by the product's safety instructions.
Avoid direct contact with uncured resin and hardener.
Keep resin and hardener away from children, pets, food, and drink.
Measure and mix the components according to the specified ratio.
Never exceed the recommended pour depth or leave a large mixed batch unattended.
Do not use open flames to remove bubbles.
Allow the artwork to cure fully before handling it without the precautions required for uncured resin.
Follow local guidance for disposing of leftover resin, hardener, and contaminated materials.
For serving trays and other objects that may come into contact with food, verify that the entire product system and its intended use are specifically suitable for that purpose. A fully cured decorative resin is not automatically food-safe.
Frequently Asked Questions About 3D Ocean Resin Art
1. How do you create a 3D ocean effect with epoxy resin?
Start with a suitable project base, then create separate areas of deep blue, turquoise, clear resin, and sandy texture. Add irregular white resin lines to represent ocean foam, and use compatible transparent layers where needed to build visual depth. Follow the resin manufacturer's instructions for mixing, pour depth, recoating, and curing.
2. Which epoxy resin is best for ocean art?
The best resin depends on the type and thickness of your project. A suitable coating resin may work for thin decorative layers, while an appropriate casting resin may be better for deeper designs. Check the product's viscosity, working time, maximum pour depth, transparency, and pigment compatibility before choosing.
3. How do you make realistic white waves with epoxy resin?
Use a compatible opaque white pigment mixed into a small amount of resin. Apply thin, irregular lines along the transition between the ocean colours and the shoreline. A manufacturer-approved heat tool or gentle airflow may help create natural lacing effects, but practise on a sample first.
4. Can beginners create 3D ocean resin art?
Yes. Beginners can start with a small, shallow project such as a coaster or decorative panel. Practise colour placement and wave techniques before attempting larger artworks or deep pours. Following the mixing ratio and curing instructions is essential for a successful result.
5. How long does ocean epoxy resin take to cure?
Curing time depends on the resin system, temperature, pour depth, and project conditions. Some products become touch-dry relatively quickly, but full curing can take several days or longer. Always follow the manufacturer's guidance before demoulding, sanding, polishing, or using the finished piece.
6. Why are my epoxy resin ocean waves not forming properly?
Wave effects may be affected by resin viscosity, pigment type, pigment quantity, temperature, and the timing of the application. If the white pigment spreads too far, the lines may lose their definition. If it does not move as expected, the resin may be too thick or the technique may not suit the product. Test small samples and adjust one variable at a time.
7. Can I use a heat gun to create ocean waves?
Only use a suitable heat tool if the resin manufacturer permits it. Excessive heat can cause bubbles, ripples, discolouration, or overheating. Keep the tool moving, avoid prolonged heating, and never use an open flame.
8. How can I make my ocean resin art look more professional?
Use a controlled colour palette, create an irregular shoreline, vary the wave patterns, and preserve clear sections between the colours. Accurate mixing, a level work surface, suitable curing conditions, and careful finishing all contribute to a polished result.
9. Can I add glitter or metallic pigments to ocean resin art?
Yes. Resin-compatible glitter and metallic pigments can create decorative highlights. Use them sparingly to maintain a realistic appearance. Too much glitter or metallic colour can reduce the natural look of the water and distract from the wave details.
10. How do I prevent bubbles in ocean resin art?
Mix slowly, prepare the surface properly, and use materials that are dry and compatible with the resin. If bubbles remain, use only an approved removal technique. Protect the piece from dust and allow it to cure under the recommended conditions.
Conclusion: Create Your Own 3D Ocean Masterpiece
Creating a 3D ocean effect with epoxy resin is a rewarding way to combine colour, texture, and creativity. By layering deep blue water, turquoise shallows, transparent resin, sandy details, and flowing white waves, you can produce artwork that captures the beauty of the ocean in a distinctive decorative form.
The key to a successful project is careful preparation, accurate mixing, suitable resin selection, controlled pigment use, and patience during curing. Start with a simple design, experiment with small samples, and gradually develop your own approach to creating realistic waves and layered depth.
Whether you are making ocean wall art, decorative trays, coasters, or a statement centrepiece, the right materials and techniques can help you achieve a smooth, glossy, professional-looking finish. With practice and attention to detail, every project can become an opportunity to create a unique piece of ocean-inspired art for your home or as a thoughtful handmade gift.
Explore suitable epoxy resin kits and compatible pigments from Epoxy Res-iT to find materials for your next creative project. Always check each product's specifications to ensure it is appropriate for your intended design and pour depth.