Step-by-Step Guide for a Perfect Professional Look
Finishing is the step that turns your resin project from “homemade” to professional-quality. Whether you’re making coasters, jewellery, trays, or tables, the final touches like sanding, polishing, and sealing make all the difference.
This guide is written in simple, practical language so you can follow it easily, even if you’re a beginner. By the end, you’ll know exactly how to finish your resin piece for a smooth, glossy, and durable result.
Why Finishing Your Resin Piece Matters
Proper finishing:
- Removes rough edges and imperfections
- Enhances shine and clarity
- Improves durability
- Gives a professional, sellable look
- Helps your product stand out in the UK resin market
If you skip finishing, even a good resin pour can look dull or uneven.
Tools & Materials You’ll Need
Before you start, gather these tools:
- Sandpaper (grits from 80 to 3000)
- Polishing compound or resin polish
- Microfiber cloth
- Water (for wet sanding)
- Protective gloves and mask
- Soft buffing pad or machine (optional)
Step 1: Check if Your Resin is Fully Cured
Before finishing, make sure your resin is completely cured.
Signs your resin is ready
- Hard and solid (not sticky)
- No fingerprints when pressed
- Edges are firm
Most epoxy resin takes 24–72 hours to cure, depending on temperature and product type.
Step 2: Start Sanding the Resin Surface
Start with coarse grit
- Use 80–120 grit to remove sharp edges
- Fix drips and uneven surfaces
Then move to finer grits
- 240 grit
- 400 grit
- 800 grit
- 1500+ grit
Always move gradually to avoid scratches.
Wet Sanding (Recommended)
- Dip sandpaper in water
- Sand gently in circular motion
- Keep surface wet
Benefits:
- Reduces dust
- Prevents overheating
- Gives smoother finish
Step 3: Clean the Surface Properly
- Wash with clean water
- Dry with a soft cloth
- Remove all dust particles
Any leftover dust can ruin your final finish.
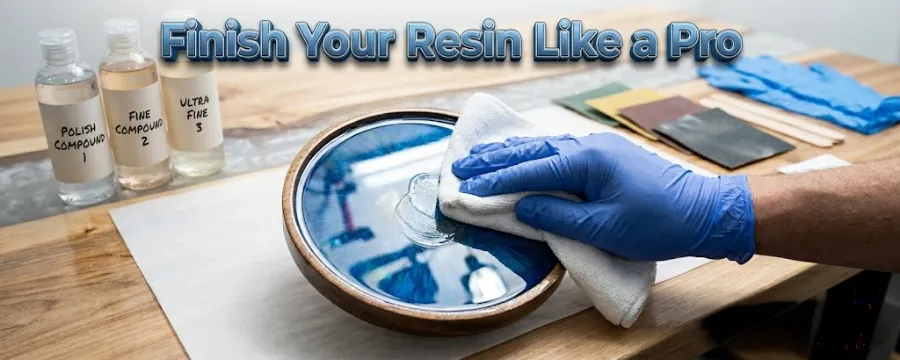
Step 4: Polish for a Glossy Finish
Hand Polishing
- Apply small amount of polish
- Rub using microfiber cloth
- Use circular motion
Machine Polishing (Faster)
- Use buffing pad
- Apply polishing compound
- Move evenly across surface
- Crystal clear finish
- Deep glossy shine
- Professional appearance
Step 5: Apply a Final Top Coat (Optional but Recommended)
Why use a top coat
- Covers sanding marks
- Adds extra shine
- Protects surface
How to apply
- Mix a small batch of resin
- Pour a thin layer
- Spread evenly
- Remove bubbles with heat gun
Step 6: Fix Edges and Corners
- Sand edges smooth
- Round sharp corners
- Polish edges like the surface
Common Mistakes to Avoid
- Sanding too fast (creates scratches)
- Skipping grit levels
- Not cleaning before polishing
- Polishing before full cure
- Using too much pressure
Tips for a Professional Resin Finish
- Work in a dust-free area
- Use proper lighting to spot imperfections
- Always sand evenly
- Use high-quality resin products
- Practice on small pieces first
Best Finishing Method Based on Project Type
For Coasters
- Sand edges carefully
- Add top coat for shine
For Jewellery
- Use very fine grit (up to 3000)
- Hand polish for precision
For Tables & Large Pieces
- Machine sanding and polishing recommended
- Apply thick top coat
How Long Does the Finishing Process Take
- Small items: 1–2 hours
- Medium items: 2–4 hours
- Large surfaces: 1 full day
Is Finishing Necessary for Every Resin Project
- Surface is already perfect from mould
- No sharp edges or defects
But for selling products, finishing is strongly recommended.
Final Thoughts
Finishing your resin piece is where the real magic happens. It’s the difference between a basic DIY project and a high-quality, professional product.
By following the right steps sanding, cleaning, polishing, and sealing you can create resin pieces that look stunning, last longer, and attract more customers.


